

We rely on our hands for countless everyday activities from getting dressed and preparing meals to writing and using our phones. When hand strength, flexibility, or coordination becomes limited it can make even the simplest of tasks feel challenging.
Hand weakness and stiffness can develop for many reasons including arthritis, injuries, surgery, or neurological conditions such as stroke, traumatic brain injury, and spinal cord injury. Fortunately, targeted hand therapy exercises exercises can help improve strength, range of motion, coordination, and overall hand function.
In this guide, we’ll explore 39 hand and finger exercises organized from beginner to advanced to help you find activities that match your current abilities. These can be incorporated into any home exercise program and offer a great way for you to stay on top of your rehab.
We’ll also share a simple 10-minute exercise routine to help you get started and build consistency with your rehabilitation so you can keep improving no matter where or how much time you have to fit in your rehab!
Let’s jump in!
Table of contents
- What Is Hand Therapy?
- How Hand Exercises Help Improve Strength and Mobility
- Stretching Exercises for Extremely Stiff or Paralyzed Hands
- Easy Hand Exercises With Household Items
- Intermediate Hand Therapy Exercises
- Advanced Hand Therapy Exercises
- Grip Strength Exercises
- Hand Strengthening Exercises with a Therapy Ball
- Hand Therapy Putty Exercises
- MusicGlove (Strength, Dexterity, and Fine Motor Skills)
- Hand Exercises for Stroke Patients with Barbara, COTA (Video)
What Is Hand Therapy?
Hand therapy is rehabilitation exercises or techniques that help restore movement, strength, and everyday use of your hand, wrist, and forearm. Usually, these are led by an occupational therapist (OT) or physical therapist (PT). Additionally, some therapists also earn extra training as a certified hand therapist (CHT).
People often see a hand therapist after a hand injury, after a stroke, or another neurological condition.
During hand therapy, a therapistcan test your strength and range of motion to then build a program that fits your goals. The exercises in this guide are the kind of home practice that can help support that work between sessions.
How Hand Exercises Help Improve Strength and Mobility
Hand and finger exercises can help improve strength, flexibility, coordination, and overall hand function. Depending on the underlying cause of hand weakness or stiffness different types of exercises that can support recovery in several ways.
For example, exercises may work to:
- Improve flexibility and range of motion: Gentle stretching and movement exercises help maintain joint mobility, reduce stiffness, and encourage smoother movement of the fingers and hands.
- Build hand and grip strength: Resistance exercises, such as squeezing, pinching, and gripping objects, help strengthen the muscles responsible for everyday hand movements.
- Improve coordination and fine motor skills: Practicing precise finger movements can help improve dexterity, making activities such as buttoning clothes, writing, and handling small objects easier.
- Promote neuroplasticity and motor recovery: Following a stroke or brain injury, repetitive hand exercises can help the brain strengthen and reorganize neural connections through a process called neuroplasticity. Research suggests that consistent, task-specific practice plays an important role in helping the brain relearn movement patterns.
For individuals recovering from neurological injuries practicing movements that relate to everyday activities is especially valuable. These can be exercises that involve gripping, releasing, reaching, and manipulating objects can help develop the skills needed for greater independence.
Hand exercises may also benefit individuals with arthritis. A Cochrane review of seven clinical trials found that exercise provided modest improvements in hand pain, stiffness, and function among people with hand osteoarthritis.
The key is consistency as regular, manageable exercise sessions are generally more sustainable than occasional, intensive workouts. Focus on performing movements with proper technique and gradually increasing difficulty as your strength and control improve.
Stretching Exercises for Extremely Stiff or Paralyzed Hands
Most therapeutic home exercise programs start with a warm-up, and your hands are no different. For those with paralyzed hands from a neurological injury like stroke, start with passive exercise. This means using your unaffected hand to help your affected hand complete the exercises.
Not only will this help prevent muscle stiffness after stroke (spasticity), but it will also keep your joints limber. Stretching your paralyzed muscles helps prepare them for voluntary movements. As your muscles strengthen due to connections from your brain to your hand, your well-stretched tissues won’t resist your weakest attempts at movement by your affected hand.
Never underestimate the importance of stretching and these passive exercises. For those who have even the slightest hand mobility, these hand therapy exercises prepare your joints for strengthening in the best way possible.
1. Wrist Extension and Flexion

Start with your forearm on a table for this gentle hand dexterity exercise. Let your hand hang off the side of the table with your palm down. Then, move your hand up and down, bending at your wrist. At the end of each movement, add some pressure from your other hand to extend the stretch at the limit of your range of motion as tolerated. This will lengthen your muscles.
Feeling tightness in your muscles as you try to lengthen them is okay, but it should not be painful. When you’re done, repeat with your palm facing up. Lengthening those forearm muscles and tendons with some added pressure is okay.
How to do it:
- Rest your forearm on a table with your hand hanging off the edge, palm down.
- Slowly bend your wrist down, then lift it up.
- At the end of each motion, use your other hand to add a gentle stretch.
- Repeat with your palm facing up.
You should feel a stretch in your forearm, but no pain. This keeps the wrist flexible, which you need for nearly every hand task.
2. Thumb Extension and Flexion

For another gentle exercise, start with your palm open, as if you were signaling the number 5. Then, practice moving your thumb over to your little finger, signaling the number 4. Continue to move your thumb back and forth between these 2 positions. As mentioned above, this can be done passively by your opposite hand moving your thumb.
How to do it:
- Start with your hand open, as if showing the number 5.
- Move your thumb across your palm toward your pinky, as if showing the number 4.
- Move it back out again.
- Repeat
Your thumb is involved in almost every grip and pinch, so keeping it flexible pays off.
3. Supination/Pronation of Your Hands
Place your hands in your lap and interlace your fingers. Then, turn your affected palm to face upward. If you straighten your elbows, you will feel this stretch in your forearm and even some in the upper arm. Hold this stretch for 20 seconds and release. Then, repeat on the other side.
How to do it:
- Sit with your elbow bent at your side, forearm resting on a table or your lap.
- Turn your palm up toward the ceiling, then down toward the floor.
- Move slowly and go as far as feels comfortable.
- Repeat
This motion matters for turning a doorknob, using a key, and bringing a spoon to your mouth.
4. Wrist Side-to-Side Bends
This exercise helps improve wrist flexibility and range of motion, supporting everyday activities that require wrist movement and control.
- Place your forearm on a table with your palm facing down and your wrist in a comfortable, neutral position.
- Slowly move your hand sideways toward your thumb, keeping your forearm resting on the table.
- Return to the starting position, then move your hand toward your pinky finger.
- Repeat the movement in both directions, staying within a comfortable, pain-free range.
Modification: If you have difficulty moving your wrist independently, use your unaffected hand to gently assist the movement. Avoid forcing your wrist beyond its comfortable range of motion.
5. Interlaced Wrist Stretch
This gentle stretching exercise helps improve wrist flexibility and range of motion, particularly for individuals experiencing stiffness or weakness in one hand.
- Bring both hands together in front of your body and gently interlace your fingers.
- Using your stronger hand for support, slowly bend your affected wrist backward until you feel a gentle stretch.
- Hold the stretch for approximately 20 seconds, keeping the movement comfortable and controlled.
- Slowly release the stretch and repeat on the opposite side if needed.
Modification: If one hand is significantly weaker than the other, allow your stronger hand to guide and support the movement. Avoid forcing the wrist into an uncomfortable position or stretching through pain.
6. Tendon Glides
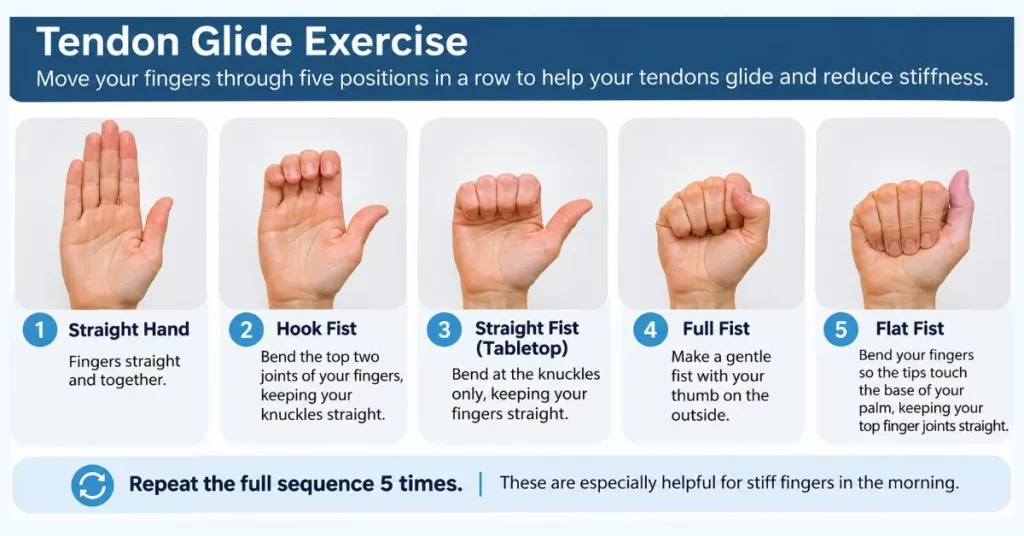
Tendon glides move your fingers through five positions in a row. Hand therapists have used this sequence for decades. A 1987 paper in the American Journal of Occupational Therapy described it as a way to let the finger tendons slide through their full range.
- Straight hand: Start with your fingers straight and together.
- Hook fist: Bend the top two joints of your fingers, keeping your knuckles straight.
- Straight fist (tabletop): Bend at the knuckles only, keeping your fingers straight.
- Full fist: Make a gentle fist with your thumb on the outside.
- Flat fist: Bend your fingers so the tips touch the base of your palm, keeping your top finger joints straight.
Return to a straight hand between each position and repeat the full sequence 5 times. These can be especially helpful for stiff fingers in the morning.
Individuals recovering from a stroke or brain injury may find these six exercises challenging enough. Pace yourself and target the areas your therapist had you working on or the places you find stiff. You can stop here and repeat these exercises with high repetition. Remember, repetition and movement provide stimulation to your brain that will help it to rewire (via neuroplasticity) and improve hand function.
But depending on where you are in your recovery you might be looking for more challenging exercises so let’s jump ahead.
Easy Hand Exercises With Household Items
Now once you have some hand movement everyday objects make great practice tools and you can use them as part of your home exercise program. They also make it easy to fit practice into your day. The following tasks are simple yet therapeutic ways to strengthen your fine motor skills.
7. Stacking Coins
Stacking coins is a simple way to improve finger coordination, precision, and fine motor control. This exercise helps develop the skills needed for everyday activities like picking up coins, handling buttons, and grasping small objects.
- Place several coins on a flat surface in front of you.
- Use your thumb and index finger to pick up one coin at a time.
- Carefully stack the coins on top of each other to build a small tower.
- Once you’ve completed your stack, take the coins apart one at a time and repeat.
Make it easier: Start with larger objects, such as checkers, coasters, or small blocks, that are easier to grasp.
Make it harder: Try picking up coins using your thumb and middle, ring, or pinky finger to challenge different finger movements.
8. Pinching Clothespins
Clothespin exercises help strengthen the small muscles of the hand while improving pinch strength and finger coordination. These skills are important for activities like holding a pen, fastening buttons, and handling utensils.
- Gather several clothespins and a small box, paper plate, or piece of cardboard.
- Hold a clothespin between your thumb and index finger.
- Squeeze the clothespin to open it, then clip it onto the edge of the box or plate.
- Continue attaching clothespins until you’ve placed them all.
- Remove each clothespin one at a time and repeat.
Make it easier: Use clothespins with lighter spring resistance or larger clips that require less finger strength.
Make it harder: Alternate between your thumb and different fingers, or use your thumb, index, and middle fingers together to practice a tripod grip.
9. Board Games and Puzzles
Board games and puzzles provide an enjoyable way to practice fine motor skills while also challenging attention, problem-solving, and coordination. Activities like checkers, chess, and jigsaw puzzles encourage repeated grasping, pinching, and releasing movements.
- Choose a board game or puzzle with pieces that match your current hand abilities.
- Use your affected hand to pick up a game piece between your fingers.
- Carefully move the piece to its intended location and release it.
- Continue playing, focusing on controlled finger movements rather than speed.
Make it easier: Start with games or puzzles that have larger pieces, making them easier to grasp and manipulate.
Make it harder: Progress to smaller puzzle pieces or games that require more precise finger movements.
Because these activities are engaging, they can also make repetitive hand exercises feel less like traditional rehabilitation and more like an enjoyable hobby plus it is something you and a loved one can do together.
10. Palm Flips (similar to pronation supination stretch)
Assisted palm flips help improve forearm rotation and range of motion. This movement is important for everyday activities like turning a doorknob, using utensils, and positioning your hand to pick up objects.
- Place your affected forearm on a table with your palm facing upward.
- Slowly rotate your forearm until your palm faces downward.
- Carefully rotate your forearm back to the starting position, with your palm facing upward.
- Repeat the movement, keeping it slow and controlled.
Make it easier: Allow your stronger hand to guide the entire movement while keeping your affected arm relaxed.
Make it harder: Try performing the movement with something in your hand.
11. Bottle Grasp and Release
This exercise helps improve grip strength, finger coordination, and the ability to open and close your hand. These movements are important for everyday activities like holding a cup, carrying objects, and using household items.
- Rest your affected forearm on a table with your palm facing upward.
- Place an empty plastic water bottle horizontally across your palm.
- Slowly curl your fingers around the bottle to form a comfortable grip.
- Gently squeeze the bottle, then relax your grip.
- Open your fingers to release the bottle and repeat.
Make it easier: Use your stronger hand to help position the bottle or gently assist your fingers in wrapping around it.
Make it harder: Practice grasping and releasing bottles of different sizes or shapes, or gradually add a small amount of water for additional resistance.
Intermediate Hand Therapy Exercises
12. Wrist Curls
Wrist curls help strengthen the muscles responsible for bending and controlling your wrist. Improving wrist strength and stability can support activities like lifting objects, holding utensils, and maintaining a steady grip.
- Sit at a table and rest your affected forearm on the surface with your palm facing upward.
- Hold an empty plastic water bottle or another lightweight object in your hand, allowing your wrist to extend slightly beyond the edge of the table.
- Slowly bend your wrist upward, lifting the bottle while keeping your forearm still.
- Lower your wrist back to the starting position in a slow, controlled movement.
- Repeat the exercise, focusing on proper form rather than speed.
Make it easier: Perform the wrist movement without holding any weight, or use your stronger hand to gently assist.
Make it harder: Gradually add small amounts of water to the bottle to increase resistance as your wrist strength improves.
13. Grip and Release Across the Table
This exercise helps improve hand-eye coordination, grip control, and the ability to pick up, move, and release objects. It combines several movements commonly used in everyday activities, such as moving utensils, organizing items, and handling small objects.
- Place a pen or another lightweight object on a table in front of you.
- Reach toward the object with your affected hand.
- Use your fingers to grasp and lift the object off the table.
- Slowly move the object to another spot on the table and gently release it.
- Pick up the object again and return it to its original position.
- Repeat the movement several times.
Make it easier: Start with larger objects, such as a small block or plastic cup, that are easier to grasp and release.
Make it harder: Use smaller objects or increase the distance between the starting and ending positions to challenge your coordination.
14. Pen Spin
The pen spin exercise helps improve finger dexterity, coordination, and the ability to move individual fingers independently. These skills are especially useful for activities like writing, buttoning clothes, and manipulating small objects.
- Hold a pen horizontally between your thumb and index finger.
- Use your thumb and fingers to slowly rotate the pen within your hand.
- Try to keep the pen moving without dropping it or using your other hand.
- Continue rotating the pen in one direction, then try reversing the movement.
Make it easier: Use a thicker pen or marker that is easier to grip. Start with small rotations rather than trying to spin the pen completely.
Make it harder: Try rotating the pen using different finger combinations or passing it between your fingers without setting it down.
15. Coin Drop
The coin drop exercise helps improve fine motor coordination and individual finger control. It challenges your hand to hold several objects while releasing them one at a time, a skill used when handling change, sorting small items, or manipulating everyday objects.
- Place approximately 5 to 8 coins in the palm of your affected hand.
- Gently curl your fingers to keep the coins from falling.
- Use your thumb and index finger to move one coin from your palm toward your fingertips.
- Carefully place that coin onto the table while keeping the remaining coins in your hand.
- Continue releasing one coin at a time until your hand is empty.
- Gather the coins and repeat.
Make it easier: Start with just two or three larger coins, giving yourself more room to move them within your hand.
Make it harder: Increase the number of coins or use smaller coins that require more precise finger movements.
This exercise is particularly useful for developing in-hand manipulation, which is the ability to move and reposition objects within one hand without assistance from the other.
16. Thumb-to-Fingertip Touches
Thumb-to-fingertip touches, also known as finger opposition exercises, help improve finger coordination, dexterity, and fine motor control. These movements are important for everyday activities like buttoning clothes, writing, and picking up small objects.
- Hold your hand in front of you with your fingers straight and spread apart.
- Slowly bring your thumb toward your index finger until the fingertips touch.
- Open your hand wide, returning to the starting position.
- Repeat the movement with your middle, ring, and pinky fingers, touching each fingertip to your thumb.
- Continue through the sequence several times, focusing on slow, controlled movements.
Make it easier: Rest your forearm on a table for support. If needed, use your stronger hand to gently assist with bringing your fingers together.
Make it harder: Increase your speed while maintaining accuracy, or try completing the sequence in reverse order, starting with your pinky finger.
For more exercises like this, explore our guides to finger exercises and finger opposition exercises.
Now let’s take a look at some of the more advanced hand therapy exercises you can try if you are further along in your recovery.
Advanced Hand Therapy Exercises
Once you’ve developed greater hand strength, coordination, and control, you may be ready to progress to more challenging exercises. These activities focus on improving finger dexterity, wrist strength, and the precise movements needed for everyday tasks.
Choose exercises that match your current abilities and focus on performing each movement with control. As your skills improve, you can gradually increase the difficulty to continue challenging your hands.
17. Palm-Down Wrist Extension (Strengthening)
Wrist extension exercises help strengthen the muscles responsible for lifting and stabilizing your wrist. Improving wrist strength can support everyday activities like reaching for objects, holding utensils, and maintaining a stable grip.
- Sit at a table and rest your forearm on the surface with your palm facing downward.
- Position your hand just beyond the edge of the table, allowing your wrist to move freely.
- Slowly lift the back of your hand toward the ceiling while keeping your forearm resting on the table.
- Hold briefly at the top of the movement, then slowly lower your hand back to the starting position.
- Repeat the movement, focusing on slow, controlled wrist extension.
Make it easier: Perform the exercise without any added weight, or use your stronger hand to gently assist the movement.
Make it harder: Hold a lightweight object, such as a small water bottle or light dumbbell, to add resistance as your strength improves.
18. Pen Rotation or Pen Twirl (Dexterity and Fine Motor Skills)
Pen rotation is an advanced fine motor exercise that challenges individual finger movements, coordination, and dexterity. It helps develop the precise finger control used for writing, handling utensils, and manipulating small objects.
- Hold a pen horizontally between your thumb, index, and middle fingers.
- Use small, controlled finger movements to begin rotating the pen around your middle finger.
- Allow your thumb, index, and ring fingers to help guide the pen through the rotation.
- Catch and stabilize the pen between your fingers as it completes the movement.
- Repeat the rotation several times, gradually working toward smoother movements.
Make it easier: Start by rotating the pen slightly between your fingertips without attempting a full spin. A thicker pen or marker may be easier to control.
Make it harder: Practice continuous rotations without dropping the pen, or try changing the direction of the movement.
19. Pen Walk or Shifting (Dexterity and Fine Motor Skills)
The pen walk exercise helps improve finger coordination, dexterity, and in-hand manipulation. These skills allow you to adjust the position of objects within your hand without needing to use your other hand.
- Hold a pen between your thumb, index, and middle fingers, as though you’re preparing to write.
- Use small finger movements to gradually slide your grip upward along the pen.
- Continue moving your fingers until you reach the opposite end of the pen.
- Reverse the movement, slowly walking your fingers back toward the writing tip.
- Repeat the exercise while trying to keep the pen from slipping or falling.
Make it easier: Use a thicker pen or marker that is easier to grip. Begin by moving your fingers a short distance rather than traveling the entire length of the pen.
Make it harder: Try walking your fingers along the pen more quickly while maintaining control, or use a thinner pen that requires more precise movements.
20. In-Hand Translation (Strength, Dexterity, and Fine Motor Skills)
In-hand translation is an advanced fine motor skill that involves moving objects between your fingertips and palm without using your other hand. This movement is essential for everyday tasks like handling coins, sorting small objects, and adjusting items within your grip.
- Place several small objects, such as coins, dry beans, or beads, on a table in front of you.
- Use your thumb and index finger to pick up one object.
- Move the object from your fingertips into your palm, gently curling your fingers to hold it in place.
- Continue picking up additional objects one at a time, collecting them in your palm.
- Once you’ve gathered several objects, use your fingers to move one object at a time from your palm back toward your fingertips.
- Carefully place each object onto the table until your hand is empty.
Make it easier: Begin with two or three larger objects that are easier to grasp and manipulate. Gradually increase the number of objects as your coordination improves.
Make it harder: Try holding more objects in your palm, using smaller items, or performing the movements without looking directly at your hand.
This exercise challenges your fingers to perform different movements simultaneously, helping develop the coordination and control needed for complex everyday activities.
21. Playing a Musical Instrument
Playing or learning a musical instrument can help improve finger coordination, dexterity, and motor control through repetitive, precise movements. Instruments such as the piano or guitar encourage you to move individual fingers while practicing timing and coordination.
- Choose an instrument you’re comfortable using, such as a piano, keyboard, or guitar.
- Start by practicing simple movements, such as pressing individual piano keys or plucking guitar strings.
- Slowly practice a short sequence of notes, focusing on moving each finger accurately.
- Repeat the sequence several times, gradually increasing the difficulty as your control improves.
Make it easier: Begin with just one or two fingers or use a digital piano app on a tablet to practice simple tapping movements.
Make it harder: Try playing more complex melodies, using additional fingers, or gradually increasing your playing speed.
Music can also make hand exercises more enjoyable, helping encourage consistent practice while working toward improved finger control. No instrument? Try a free piano or guitar app on a phone or tablet and tap along to a simple song.
Grip Strength Exercises
Grip strength plays an important role in everyday activities such as carrying groceries, opening jars, holding utensils, and grasping objects securely. Strengthening the muscles in your hands and forearms can help improve your ability to perform these tasks with greater control and independence.
Grip strength is also an important indicator of overall physical health. A large study involving nearly 140,000 adults across 17 countries found that every 5 kg (approximately 11 pounds) decrease in grip strength was associated with a 16% higher risk of death during the follow-up period.
While this association doesn’t mean that improving grip strength will directly increase life expectancy, it highlights the relationship between hand strength and overall health.
The following exercises focus on improving grip strength, muscular endurance, and hand control using simple household objects and rehabilitation tools.
Recommended repetitions: Aim for 5 to 10 repetitions per exercise, completing 1 to 2 sets with approximately 60 seconds of rest between sets. Adjust based on your abilities and rehabilitation team’s recommendations.
22. Towel Wringing
Towel wringing is a simple exercise that helps strengthen your grip, wrists, and forearms. The twisting motion also encourages both hands to work together, supporting activities such as opening containers, washing clothes, and handling household objects.
- Sit comfortably and hold a small hand towel with both hands.
- Position your hands a comfortable distance apart and gently grip the towel.
- Slowly twist your hands in opposite directions, as though you’re wringing water out of the towel.
- Return to the starting position, then twist the towel in the opposite direction.
- Continue alternating directions, focusing on slow, controlled movements.
Make it easier: Use a thin, dry towel and apply only light pressure. If one hand is weaker, allow your stronger hand to guide the movement.
Make it harder: Use a thicker towel or slightly dampen it to increase resistance.
23. Hand Gripper Squeezes
Hand grippers are resistance tools designed to strengthen the muscles responsible for closing your hand and maintaining a firm grip. This exercise can help improve your ability to hold objects securely, carry bags, and perform activities requiring sustained gripping.
- Hold a hand gripper comfortably in your affected hand, positioning the handles across your palm and fingers.
- Slowly squeeze the handles together as far as you comfortably can.
- Hold the squeeze for approximately 2 to 3 seconds.
- Gradually release the pressure, allowing your fingers to open in a controlled movement.
- Repeat the exercise, focusing on maintaining a steady grip throughout each repetition.
Make it easier: Choose a hand gripper with light resistance or use a soft foam ball that requires less force to squeeze.
Make it harder: Gradually increase the resistance as your grip strength improves, or extend the amount of time you maintain each squeeze.
24. Light Farmer’s Carry
The farmer’s carry helps develop functional grip strength by challenging your hand to hold an object while you move. This exercise also engages your forearm, shoulder, and core muscles, making it useful for activities like carrying groceries and transporting household items.
- Choose a lightweight object with a secure handle, such as a small grocery bag or partially filled water jug.
- Stand upright and hold the object at your side with your affected hand.
- Keep your shoulders relaxed, your wrist in a comfortable position, and your grip steady.
- Slowly walk a short distance across the room while maintaining control of the object.
- Set the object down carefully, rest, and repeat as appropriate.
Make it easier: Practice holding the object while seated or standing in a stable position instead of walking. Start with a very lightweight item.
Make it harder: Gradually increase the weight of the object or the distance you carry it, provided you can maintain proper posture and a secure grip.
Safety tip: This exercise requires adequate balance and walking stability. If you’re recovering from a stroke or another neurological injury and have difficulty with balance, consult your rehabilitation team before attempting it. Avoid carrying objects that interfere with the use of a cane, walker, or other mobility aid.
25. Rice Bucket Grabs
Rice bucket exercises provide resistance as you move your fingers through uncooked rice. This activity helps strengthen the muscles responsible for gripping, releasing, and spreading your fingers while also challenging hand coordination.
- Fill a deep bowl or small bucket with enough uncooked rice to comfortably submerge your hand.
- Place your affected hand into the rice with your fingers extended.
- Slowly curl your fingers inward, gathering a handful of rice.
- Gently squeeze the rice in your hand, then relax your grip and release it back into the container.
- Spread your fingers apart against the resistance of the rice.
- Repeat the sequence, alternating between gripping, releasing, and spreading your fingers.
Make it easier: Begin with a shallow layer of rice and practice opening and closing your hand near the surface to reduce resistance.
Make it harder: Submerge your hand deeper into the rice or perform additional movements, such as rotating your wrist or spreading your fingers against greater resistance.
Rice bucket exercises can be particularly useful for practicing both finger flexion (closing your hand) and finger extension (opening your hand), which are important for grasping and releasing objects during everyday activities.
Hand Strengthening Exercises with a Therapy Ball
For some affordable and effective hand strengthening exercises, grab a set of hand therapy balls, which are a popular and affordable physical therapy tool. They usually come in different thicknesses so that you can keep yourself consistently challenged.
Resistance builds strength in your hand by placing demand on your muscles, which helps grow the muscle and nerve fibers. Use a soft ball if you’d like to focus on hand coordination and dexterity and use a firm ball if you’re focusing on hand strengthening exercises.

26. Power Grip
For a basic hand-strengthening exercise, squeeze a therapy ball with your fingers and thumb. Focus on pressing the pads and tips of your fingers into the ball. Pick a ball with a thickness that challenges you.
27. Pinch
Pinch the ball with fingers and thumb extended, bending only at the knuckles. Press your fingers down into the top of the ball and your thumb upward on the bottom of the ball. As with all these hand-strengthening exercises, this should make you feel challenged. If not, try to use a firmer ball.
28. Thumb Extension
Roll the ball up and down your palm by using your thumb. This requires a lot of movement from your thumb.
29. Table Roll
With the ball placed on a table, roll the ball from the tip of your fingers to your palm and back. This hand therapy exercise requires more coordination than strength.
30. Finger Flexion
Hold the ball in your palm and press your fingers into the ball. This is different from the power grip above because you’re focusing on an inward movement instead of a global gripping movement. Imagine that you’re pressing your fingers straight into your palm.
31. Thumb Roll
Use your thumb to roll the ball in a circular motion on your palm. This is less about strength building and more about improving dexterity and fine motor skills.
32. Finger Squeeze
Squeeze the ball between any two fingers. This exercise builds strength in the small muscles of your hand and provides a gentle stretch between the fingers.
33. Thumb Opposition
Roll the ball side to side on your palm using your thumb. This requires strength in your thumb as well as some coordination.
34. Finger Scissors
Squeeze the putty between two fingers. This strengthens the small muscles in the hand and provides stretch to the web space between the fingers.
For a complete list of Hand Strengthening Exercises with a Therapy Ball check out our article with Hand Therapy Ball Exercises For Stroke Patients to Improve Fine Motor Skills.
Hand Therapy Putty Exercises
Putty provides an alternative to the therapy balls and tools described above. Hand therapy putty exercises with putty can be similar to the exercises described above, but the putty is more pliable and, therefore, can be graded to varying ability levels. Plus, putty allows for some creative exercises, as described below.
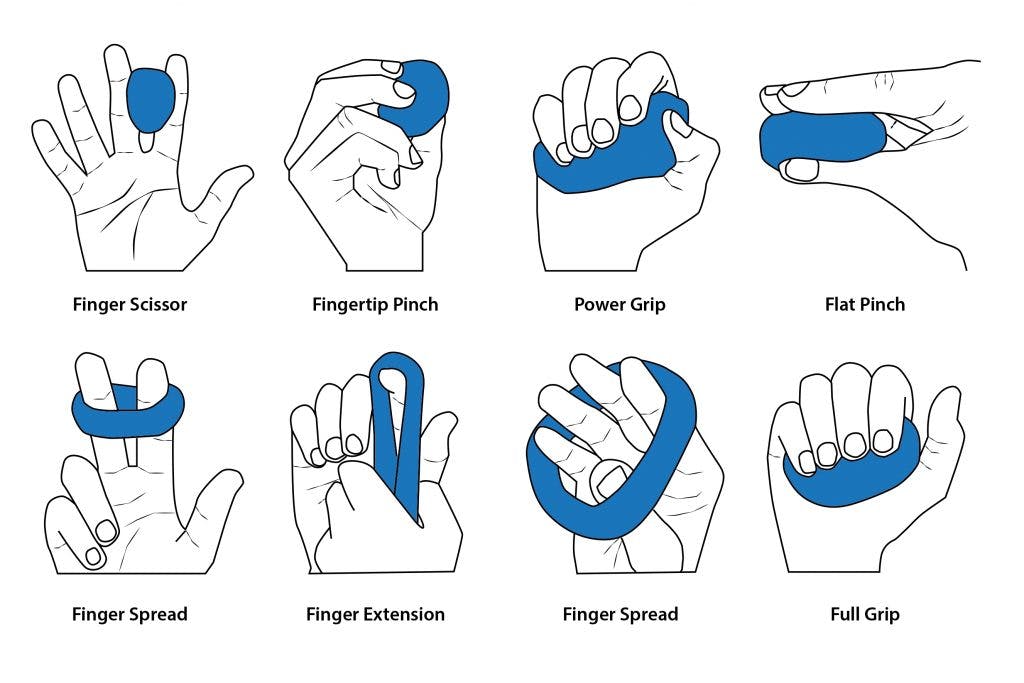
35. Fingertip Pinch
Pinch the putty using your thumb and fingertips. This also develops strength and dexterity in the fingers and reaches the small muscles in your hand.
36. Power Grip
Squeeze all your fingers into the putty. This strengthening exercise targets the muscles of your forearm, which control the hand.
37. Flat Pinch
Pinch the putty down into your thumb with straightened fingers. Only your knuckles should be flexed while the fingers remain straight. This develops your dexterity.
38. Finger Spread
Wrap the putty around two fingers and spread your fingers apart. This helps strengthen muscles inside the hand more than the forearm muscles that power the hand.
39. Finger Extension
Wrap the putty around a hooked finger and then straighten your finger using the putty as resistance.
40. Finger Spread
Wrap the putty around your hand and then spread your fingers out to stretch the putty. This targets all the muscles in your forearm that control extension of the fingers.
41. Full Grip
Squeeze down on the putty, pressing your fingers into your palm.
For a complete list of hand therapy putty exercises check out our article Helpful Hand Therapy Putty Exercises + Free PDF
MusicGlove (Strength, Dexterity, and Fine Motor Skills)

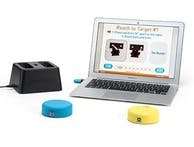
Looking for a more engaging way to improve hand strength, dexterity, and fine motor skills? Flint Rehab’s MusicGlove hand therapy is an interactive, music-based device that improves hand function after neurological injury like stroke or brain injury. It works by motivating patients to make hundreds of therapeutic hand movements while following along to an interactive game.
As users follow along with music, they practice hundreds of therapeutic finger movements that help improve grip and release, coordination, and overall hand function.
MusicGlove is backed by clinical research, with improvements in hand function observed in stroke survivors after just two weeks of training.
Whether you’re recovering from a stroke or another neurological injury, MusicGlove offers a fun, motivating way to incorporate repetitive hand exercises into your rehabilitation routine at home.
Click here to learn more about MusicGlove from Flint Rehab »
Hand Exercises for Stroke Patients with Barbara, COTA (Video)
Now it’s time to meet Barbara, our favorite occupational therapy assistant. Barbara can walk you through some helpful hand exercises. Try her expert hand therapy exercises in the video below, or by reading the instructions that follow:
Frequently Asked Questions About Hand Exercises
How often should I do hand exercises?
For most people, once or twice a day is a good place to start. Short, regular sessions tend to work better than long, rare ones. If you’re in therapy, your therapist may give you a specific schedule, so follow that first.
Do hand exercises help arthritis?
They can. A Cochrane review found small improvements in pain, function, and finger stiffness for people with hand osteoarthritis who exercised. Gentle stretches and tendon glides are a good place to start. Avoid pushing through sharp joint pain, especially during a flare.
How long until I see results?
It depends on your condition, how often you practice, and where you’re starting from. Some people notice less stiffness within a few days. Strength and fine motor gains usually take weeks of steady practice. Progress may slow at times, but that doesn’t mean it has stopped.
What if my hand can’t move at all after a stroke?
Start with assisted exercise. Use your stronger hand to move your affected hand through stretches like #1, #3, and #4. This keeps your joints flexible and gives your brain practice with the movement. Talk to your therapist about other options, too. Our guide to hand recovery after stroke covers more approaches.
Should I use a stress ball or a hand gripper?
Both can help. A soft ball is better for early control and coordination. A gripper or firm ball is better once you’re focused on building grip strength. Start with lighter resistance and work up as exercises feel easier.
What are the best hand exercises to start with?
The quick routine at the top of this page is a solid start. Tendon glides, wrist bends, thumb-to-fingertip touches, and a basic ball squeeze cover stretching, coordination, and strength in just a few minutes.
Moving Forward
Stiff, weak, or clumsy hands can make daily life frustrating. But your hands can respond to practice, and every repetition is a step in the right direction.
Start with exercises that match your current abilities and gradually increase the difficulty as your strength and control improve. Focus on movements that support your personal goals, whether that’s writing, buttoning clothes, or gripping everyday objects.
As exercises start to feel easy, add resistance, try harder variations, or move up a section. Then take one question to your next therapy visit: “Which of these exercises should I focus on most for my goals?”
Remember, consistency is key. Even short, regular exercise sessions can help you build skills and make meaningful progress over time.
We hope you enjoyed this article and subscribe to our newsletter for weekly articles just like this delivered straight to your inbox — subscribe here.
Related Articles
Here are some additional articles you might be interested in:
- Maximizing Hand Recovery After Stroke: How to Improve Hand and Finger Mobility: Learn the methods that help hand function return after a stroke, from early stages to years later.
- Best Physical Therapy Tools for Hands: Improve Strength, Mobility, and Function With Rehab Tools at Home: Compare the home tools that can make your hand practice easier and more effective.
- 8 Stretching Exercises for Hand Spasticity After Stroke: See gentle stretches for tight, curled fingers and why they help.
- Finger Opposition Exercises: Improve Hand Coordination, Dexterity, and Fine Motor Skills: Go deeper on the thumb-to-finger moves that power everyday tasks like buttoning and writing.
- How to Recover Hand Function After Brain Injury: Causes, Types, & Treatment: Find out why brain injury affects the hands and what treatment options can help.